位图切片组件(Clip)
Clip 组件可以用来播放切片动画,和显示切片动画的某一帧图片。Clip 可以将一张图片,按横向分隔数量 ClipX、竖向分隔数量 ClipY,或横向分割每个切片的宽度 ClipWidth、竖向分割每个切片的高度 ClipHeight,从左向右,从上到下,分割组合为一个切片动画。Clip 的脚本接口参考Clip API。
一、通过LayaAir IDE创建Clip组件
1.1 创建Clip
如图1-1所示,可以在层级窗口中右键进行创建,也可以从小部件窗口中拖拽添加。

(图1-1)
在创建的工程中,LayaAir会自带一个Clip 组件的资源示例(clip_num.png),效果如图1-2。
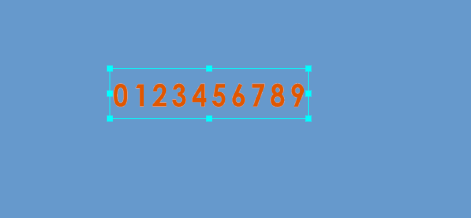
(图1-2)
1.2 Clip 组件的常用属性
Clip组件的特有属性如下:
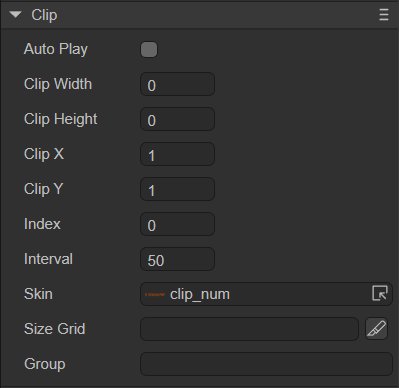
(图1-3)
| 属性 | 功能说明 |
|---|---|
| 自动播放 autoPlay | 布尔值,表示是否自动播放当前切片动画。 |
| 根据宽高切片 clipBySize | 默认为flase,即根据X,Y轴数量分割,勾选后通过宽高来分割切片,详情见表格后内容。 |
| 切片宽度 clipWidth | 横向分割图片资源时,每个切片的宽度。 |
| 切片高度 clipHeight | 纵向分割图片资源时,每个切片的高度。 |
| X轴数量 clipX | 横向分割图片资源时,等宽切割的份数。 |
| Y轴数量 clipY | 纵向分割图片资源时,等高切割的份数。 |
| 索引 index | 切片动画当前显示动画帧索引。 |
| 时间间隔 interval | 切片动画的播放时间间隔。 |
| 纹理 skin | 切片动画的纹理。 |
| 九宫格 sizeGrid | 图像资源的有效网格数据(九宫格数据)。 |
| 资源分组 group | 加载分组,设置后可以按组管理资源。 |
点击依据宽高切片可以切换位图切片分割模式,根据宽高分割切片,这里我们输入宽为26即可把原本260像素宽的原图分割为10份。如图1-4所示:

(图1-4)
如果不勾选依据宽高切片,设置X轴数量为10,会将十个数字等分,同样能达到期望效果,效果如下:
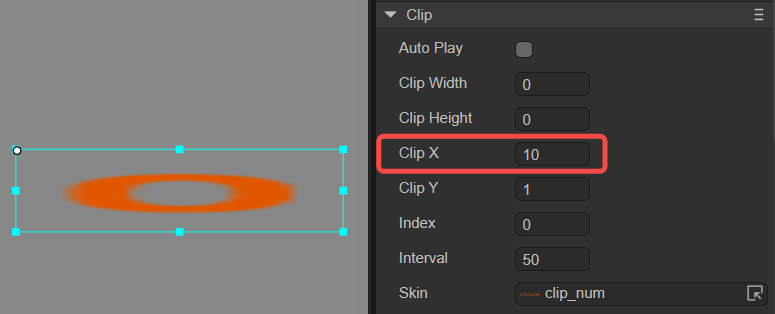
(图1-5)
1.3 脚本控制Clip
有时,要通过代码设定Clip相关的属性,就需要用到脚本了。在Scene2D的属性设置面板中,增加一个自定义组件脚本。然后,将Clip组件拖入到其暴露的属性入口中。下面给出一个示例代码,实现脚本控制Clip:
const { regClass, property } = Laya;

@regClass()
export class NewScript extends Laya.Script {

    @property({ type: Laya.Clip })
    public clip: Laya.Clip;

    //组件被激活后执行,此时所有节点和组件均已创建完毕,此方法只执行一次
    onAwake(): void {
        this.clip.pos(Laya.stage.width >> 1, Laya.stage.height >> 1); // 位置
        this.clip.skin = "atlas/comp/clip_num.png"; // 皮肤
        this.clip.interval = 1000; // 切片动画的播放时间间隔1000毫秒
        this.clip.clipX = 10; // 切片x轴数量
        this.clip.autoPlay = true; // 动画自动播放
    }
}
二、通过代码创建Clip组件
在进行书写代码的时候,免不了通过代码控制UI,创建UI_Clip类,通过代码设定Clip相关的属性。
通过代码创建计数器,运行示例效果:
(动图2-1)
示例说明:
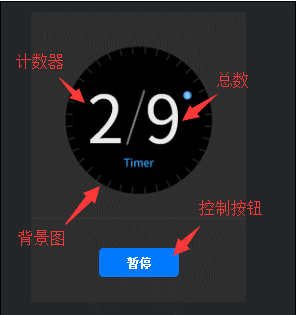
(图2-2)
Clip的其他属性也可以通过代码来设置,上述示例演示了如何通过计时器获取每一秒更新clip.clipX切片,通过每秒更新数字实现计时器的功能,有兴趣的读者可以自己通过代码设置Clip,创建出符合自己项目中需要的Clip。
注:需要将图片资源的纹理类型设置为“精灵纹理”。
示例代码:
const { regClass, property } = Laya;

@regClass()
export class UI_Clip extends Laya.Script {

    // 以下资源来自“引擎API使用示例”
    private buttonSkin: string = "resources/res/ui/button-7.png";
    private clipSkin: string = "resources/res/ui/num0-9.png";
    private bgSkin: string = "resources/res/ui/coutDown.png";

    counter: any;
    controller: any;
    currFrame: any;


    //组件被激活后执行,此时所有节点和组件均已创建完毕,此方法只执行一次
    onAwake(): void {
        Laya.loader.load([this.buttonSkin, this.clipSkin, this.bgSkin]).then( ()=>{
            this.onSkinLoaded();
        } );
    }

    private onSkinLoaded(e: any = null): void {
        this.showBg();
        this.createTimerAnimation();
        this.showTotalSeconds();
        this.createController();
    }

    private showBg(): void {
        var bg: Laya.Image = new Laya.Image(this.bgSkin);
        bg.size(224, 302);
        bg.pos(Laya.stage.width - bg.width >> 1, Laya.stage.height - bg.height >> 1);
        this.owner.addChild(bg);
    }

    private createTimerAnimation(): void {
        this.counter = new Laya.Clip(this.clipSkin, 10, 1);
        this.counter.autoPlay = true;
        this.counter.interval = 1000;
        this.counter.x = (Laya.stage.width - this.counter.width) / 2 - 35;
        this.counter.y = (Laya.stage.height - this.counter.height) / 2 - 40;
        this.owner.addChild(this.counter);
    }

    private showTotalSeconds(): void {
        var clip: Laya.Clip = new Laya.Clip(this.clipSkin, 10, 1);
        clip.index = clip.clipX - 1;
        clip.pos(this.counter.x + 60, this.counter.y);
        this.owner.addChild(clip);
    }

    private createController(): void {
        this.controller = new Laya.Button(this.buttonSkin, "暂停");
        this.controller.labelBold = true;
        this.controller.labelColors = "#FFFFFF,#FFFFFF,#FFFFFF,#FFFFFF";
        this.controller.size(84, 30);

        this.controller.on('click', this, this.onClipSwitchState);

        this.controller.x = (Laya.stage.width - this.controller.width) / 2;
        this.controller.y = (Laya.stage.height - this.controller.height) / 2 + 110;
        this.owner.addChild(this.controller);
    }

    private onClipSwitchState(e: any = null): void {
        if (this.counter.isPlaying) {
            this.counter.stop();
            this.currFrame = this.counter.index;
            this.controller.label = "播放";
        }
        else {
            this.counter.play();
            this.counter.index = this.currFrame;
            this.controller.label = "暂停";
        }
    }
}